

In this article, I am going to be stating a step-by-step process of deploying a MERN app (Mongoose, Express, React, Node js) on AWS using ECR and docker-compose
Prerequisite
This tutorial assumes that you have a basic knowledge of how a MERN stack app works and you understand how to run the server on the client and backend.
If you dont you can read this article by MongoDB Setting up a MERN stack app
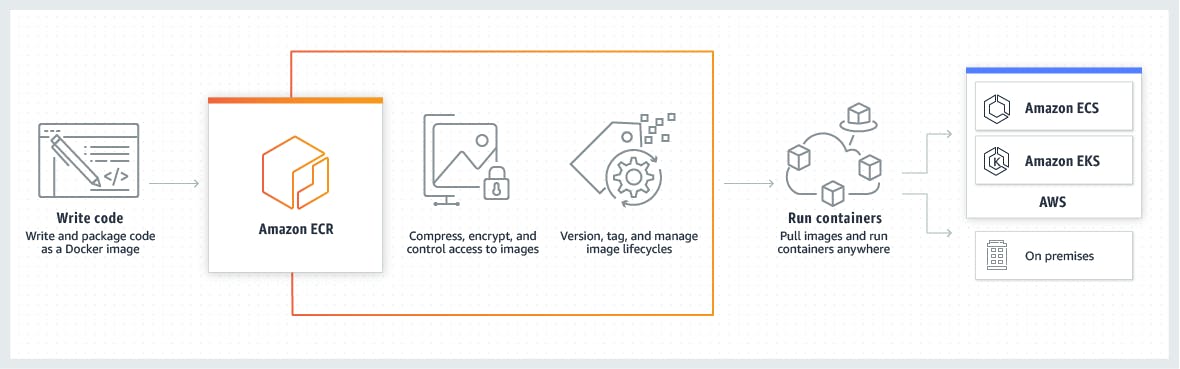
What is ECR?
Amazon ECR is a fully managed container registry offering high-performance hosting, so you can reliably deploy application images and artifacts anywhere. Think of this like a Docker Hub repository where our built docker image can be pushed and called from at any time but instead, this is on AWS.
What is docker-compose?
Have you ever containerized a microservice app that has multiple independent features with docker? Can you remember how stressful it is to start running each of the services in its own Dockerfile one after the other? Docker compose simplify this. You just need to run the docker-compose file once and it stats all our containers(Dockerfile) concurrently. Think of this as Docker Swarm used for running multiple containers
What is Terraform?
Terraform helps you build, change, and destroy AWS infrastructure by running a single command! You can provision resources like security, VPC, subnets, route table etc by creating a terraform file and applying it
We are going to be dockerizing a MERN app and deploying it with docker-compose then push the image to AWS ECR. The GitHub repo can be found here. Note: The current state of the repo has further functions (like terraform) integrated, so you can pull just the "Dockerize" branch for simplicity
Step 1
Creating our Dockerfile for the Client(React frontend)
#Clone the Dockerize branch
$ git clone --branch Dockerize https://github.com/codedfinger/MyWatch.git
or Clone the entire repo
$ git clone https://github.com/codedfinger/MyWatch.git
#Navigate into the Client Folder
$ cd MyWatch/client
#Install all packages
npm install
You can run the server and access some of the GET route to ensure all is working. If you have challenges you can refer to the article above on how to set up a MERN stack app
#Create a Dockerfile in the root of the client folder and add the following contents
# Dockerfile for React client

# Build react client
FROM node:10.16-alpine

# Working directory be app
WORKDIR /usr/src/app

COPY package*.json ./

###  Installing dependencies

RUN npm install --silent

# copy local files to app folder
COPY . .

EXPOSE 3000

CMD ["npm","start"]
#Build the frontend with the Dockerfile
$ docker build -t react-app .
To verify everything is fine, we run our newly built container using the command:
$ docker run -p 3000:3000 react-app .
This will run just the Client.
Similarly, We follow the same steps for our Server side
#Navigate into the Server Folder
$ cd MyWatch/server
#Install all packages
$ npm install
#Creating dockerfile for the backend(Nodejs)
#  Dockerfile for Node Express Backend

FROM node:10.16-alpine

# Create App Directory
RUN mkdir -p /usr/src/app
WORKDIR /usr/src/app

# Install Dependencies
COPY package*.json ./

RUN npm install --silent

# Copy app source code
COPY . .

# Exports
EXPOSE 5000

CMD ["npm","server"]
to ensure our app is working well, we can run
$ docker build -t node-app .
In the main directory of the project, (outside the server/client) create a file named docker-compose.yml and add the below code into the file
version: '3.7'

services:
  server:
    build:
      context: ./server
      dockerfile: Dockerfile
    image: myapp-server
    container_name: myapp-node-server
    command: /usr/src/app/node_modules/.bin/nodemon server.js
    volumes:
      - ./server/:/usr/src/app
      - /usr/src/app/node_modules
    ports:
      - "5000:5000"
    depends_on:
      - mongo
    env_file: ./server/.env
    environment:
      - NODE_ENV=development
    networks:
      - app-network
  mongo:
    image: mongo
    volumes:
      - data-volume:/data/db
    ports:
      - "27017:27017"
    networks:
      - app-network
  client:
    build:
      context: ./client
      dockerfile: Dockerfile
    image: myapp-client
    container_name: myapp-react-client
    command: npm start
    volumes:
      - ./client/:/usr/app
      - /usr/app/node_modules
    depends_on:
      - server
    ports:
      - "3000:3000"
    networks:
      - app-network

networks:
    app-network:
        driver: bridge

volumes:
    data-volume:
    node_modules:
    web-root:
      driver: local
#Building our MERN app
For us to create the build for the whole application, we need to run the following command:
$ docker-compose build
Starting the Services We can start the multi-container system using the following simple command:
$ docker-compose up
now if we navigates to localhost:3000 we will see our React Frontend.
And also the backend can be found on localhost:5000
And MongoDB is running on localhost:27017
Provisioning our infrastructure on AWS with terraform
We are going to be creating a repo on ECR and pushing our image from the docker-compose file to this repository
Create a new folder named "deployment" to store your terraform code and navigate into this folder.
Inside the deployment folder, create a file named provider.tf. In this, we will state the platform we want to use and set basic things like AWS region and AWS profile
provider "aws" {
  region  = "eu-west-1"
  profile = "test"
}
Note: You need to set up AWS CLI and create an IAM user. The profile line in the above code will be your profile name set up in AWS CLI
Next, inside of the deployment folder, create a file called ecr.tf and add the following lines of code
resource "aws_ecr_repository" "ecr_repo" {
    name = "ecr_example_repo"
}
In the above snippet, this is going to create a repository on AWS ECR with the name ecr_example_repo
Deploying to AWS
Run this command in the deployment folder
$ terraform init
This downloads plugins for the resources we mentioned above in the ecr.tf file
Next is to run the command
$ terraform plan
This command is like a pop-up to allow you to confirm the AWS resources you are setting up.
And finally
$ terraform apply
This will create a repo on ECR. you can check this by logging into your AWS account and viewing the repo on your ECR
Authenticating to Docker
We have a repo, now we need to make sure we are authenticated to it so we can push and pull images.
This can be done by using the following commands:
ACCOUNT_ID=$(aws sts get-caller-identity | jq -r ".Account")
aws ecr get-login-password --region eu-west-1 | docker login --username AWS --password-stdin "$ACCOUNT_ID.dkr.ecr.eu-west-1.amazonaws.com"
Pushing our Docker Image to ECR
Now that we're authenticated, we can push our local docker image to the remote repo. This is done in two steps, tagging our local image and pushing our changes.
Find the repository url from your docker image, and copy it. Then, run:
$ docker tag some-example-image:latest <repo_url>:latest
This is kind of similar to a git remote add origin in git.
Then, run:
$ docker push <repo_url>:latest
to upload the image to the remote repo. This is similar to a git push in git.
Head back to your AWS console, and verify you can see the image you uploaded.
You have done it!!
In the next article we will look at deploying to ECS and all of the settings.